Application portals love file limits. Job sites, exam registrations, visa forms and university admissions usually ask for something like "photo: JPG, max 100KB" and "signature: max 20KB". A photo straight off a phone is 1–5 MB, so the upload fails and the form doesn't tell you how to fix it.
This guide gives you settings that work. I ran real 12-megapixel photos and a scanned signature through our image compressor at different settings and wrote down the output sizes. You can go straight to the right combination instead of guessing.
Quick Answer
Open Compress Image, upload the photo, set Output format to JPG, then pick one of these:
- Under 100KB: Max width/height 1280 px, quality 60
- Under 50KB: Max width/height 800 px, quality 75
- Under 20KB: Max width/height 800 px, quality 40. For a signature: 1280 px, quality 60
Check the size shown next to the result. If it's still over the limit, lower the quality by 10 or step down one size, then click Recompress All. Everything runs in your browser, so the photo is never uploaded to our server.
Why "Quality" Alone Doesn't Get You There
File size depends on two things: how many pixels the image has and how hard each pixel is compressed. A 4032×3024 phone photo has more than 12 million pixels. Even at low JPEG quality, that's a lot of data.
In my tests, quality alone could not get a full-size 12MP photo anywhere near 100KB:
| Setting (full 4032×3024 size) | Output size |
|---|---|
| Quality 75 | 645 KB |
| Quality 60 | 560 KB |
| Quality 40 | 274 KB |
Even quality 40 left the file almost three times over a 100KB limit, and it was already showing blocky artifacts. Reducing the dimensions is what actually shrinks the file. Most forms show your photo as a small thumbnail anyway, so 800–1280 pixels on the long side is plenty.
Tested Results: What Each Setting Actually Produces
I used three 12MP photos (landscape 4032×3024, portrait 3024×4032 and a square 3024×3024 crop, each 1.3–1.5 MB as JPEG) plus a 2400×900 scan of a handwritten signature on paper (301 KB). Each was run through Compress Image with output kept as JPG. "Max width/height" limits the longest side and keeps the aspect ratio.
| Max width/height | Quality | Landscape photo | Portrait photo | Square photo | Signature scan |
|---|---|---|---|---|---|
| 1920 px | 75 | 163 KB | 163 KB | 241 KB | 46 KB |
| 1920 px | 60 | 114 KB | 104 KB | 155 KB | 27 KB |
| 1920 px | 40 | 82 KB | 67 KB | 96 KB | 20 KB |
| 1280 px | 75 | 87 KB | 78 KB | 102 KB | 21 KB |
| 1280 px | 60 | 62 KB | 51 KB | 66 KB | 14 KB |
| 1280 px | 40 | 45 KB | 34 KB | 43 KB | 11 KB |
| 800 px | 75 | 40 KB | 32 KB | 45 KB | 9 KB |
| 800 px | 60 | 30 KB | 23 KB | 30 KB | 7 KB |
| 800 px | 40 | 22 KB | 16 KB | 21 KB | 6 KB |
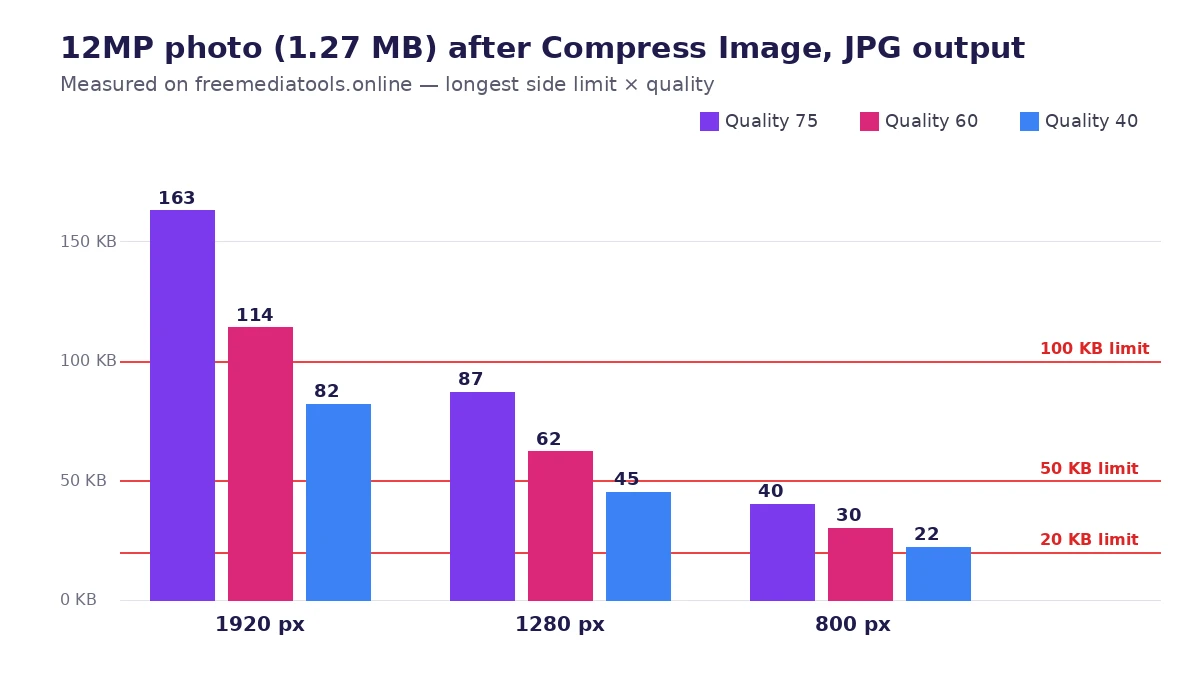
Two things stand out:
- The same settings give different sizes for different photos. The square crop had more fine detail (hair, fabric texture) and came out 20–50% bigger than the others. Detail costs bytes, so a photo of a plain wall compresses far better than a photo of a tree.
- 1280 px at quality 75 is not a safe 100KB setting. It worked for two photos but gave 102 KB on the third. That's why the Quick Answer uses quality 60 at 1280 px: all three landed between 51 and 66 KB.
Pro tip: Your results will differ from mine because every photo is different. Use the table to choose a starting point, then adjust once. You'll rarely need more than two tries.
Step-by-Step: Compress a Photo to Under 100KB
-
Open Compress Image and drop your photo in. JPG, PNG, WebP, HEIC, BMP and TIFF all work.
-
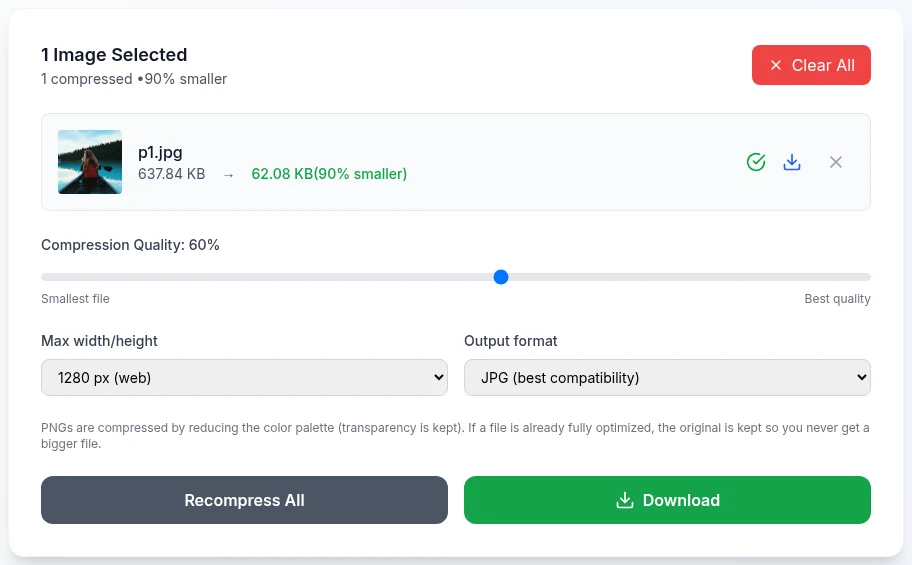
Set Max width/height to 1280 px (web).
-
Move the Quality slider to 60.
-
Set Output format to JPG (best compatibility). Many government and exam portals only accept JPG/JPEG, and JPG is the safest choice even when a form doesn't say.
-
Click Compress 1 Image. The result row shows the old size, the new size and the percentage saved.
-
If the new size is over your limit, lower quality to 50 or switch to 800 px and click Recompress All.
-
Download the file and upload it to the form.
Step-by-Step: Under 50KB and Under 20KB
For 50KB: use 800 px at quality 75. In my tests this gave 32–45 KB for all three photos. That's under the limit with room to spare, and the image stays clean because quality 75 doesn't produce visible artifacts. 1280 px at quality 40 also fits (34–45 KB), but at that quality skin tones and edges start to look smudged.
For 20KB: this is tight for a photo. 800 px at quality 40 produced 16, 21 and 22 KB, so two of the three photos were still slightly over. If yours is one of them:
- Open Resize Image and resize the photo to 600 px on the long side (keep Maintain aspect ratio ticked).
- Bring the resized file back into Compress Image, leave Max width/height at Keep original size, choose JPG, and try quality 60.
The resize tool saves at high quality (95%), so the resized file can look large at first. The compressor brings it down.
Signatures: The Easy One
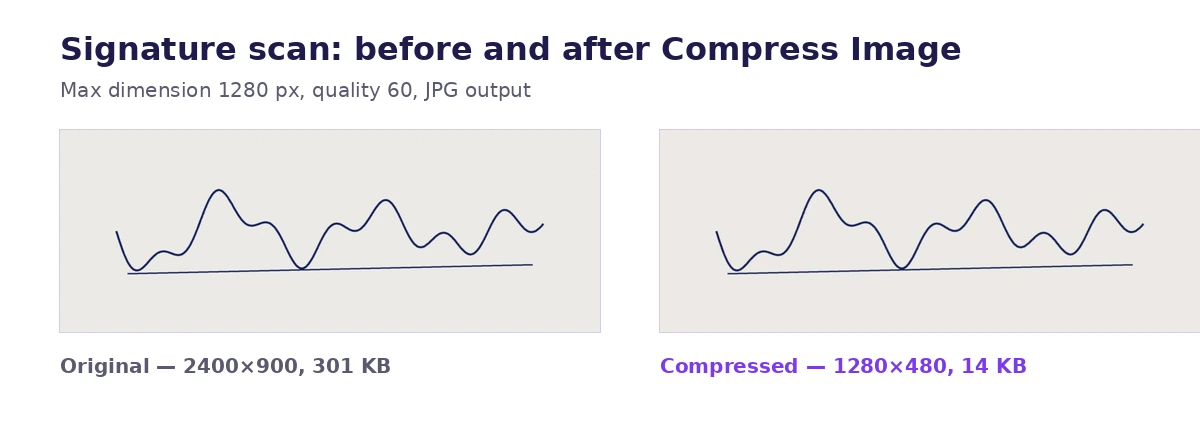
A signature is mostly blank paper, so it compresses very well. My 2400×900 scan went from 301 KB to 14 KB at 1280 px / quality 60, and the ink lines stayed sharp. That's comfortably under a typical 20KB signature limit.
Before compressing a signature:
- Crop out the empty paper. Use Crop Image and keep a small margin around the ink. Less blank area means fewer pixels and a smaller file.
- Photograph it in good light. Shadows and grey paper texture are detail the compressor has to store. An evenly lit white page compresses smaller and looks better.
- Don't go too small. Some portals set a minimum as well as a maximum ("signature size should be at least 20kb" is a real Google search). If yours has a minimum, raise the quality rather than the dimensions.
When the Form Also Asks for Exact Pixel Dimensions
Some forms specify pixels as well as KB, for example "200×230 px, 20–50KB". Do it in this order:
- Crop to the right shape. In Crop Image, type the Width and Height directly. They're in the original image's pixels, so for a 200×230 photo you could crop a 2000×2300 area around your face. Same shape, more detail.
- Resize to the exact size. In Resize Image, untick Maintain aspect ratio only if your crop wasn't exactly the right shape, then enter 200 and 230.
- Compress last. In Compress Image, keep Keep original size selected so the dimensions don't change, and lower the quality until the file fits.
A 200×230 image is tiny (46,000 pixels), so it usually lands under 20KB even at quality 75.
If you need help choosing a crop shape, our guide to cropping images to perfect aspect ratios covers the common ratios.
KB vs kB: Leave Yourself a Margin
There's a small trap here. Our compressor, and most software, counts 1 KB = 1,024 bytes. Some websites count 1 kB = 1,000 bytes. A file our tool shows as 99 KB is 101,376 bytes. A portal that counts in thousands will see that as 101 kB, which is over a 100kB limit.
Warning: Aim for about 90% of the limit: under 90 KB for a 100KB form, under 45 KB for 50KB, under 18 KB for 20KB. That covers both counting methods and any size the website adds while processing the upload.
Should You Use WebP Instead?
WebP is much smaller at the same quality. At 800 px and quality 60, WebP gave 11–19 KB where JPG gave 23–30 KB. The catch is that many application forms reject WebP files. Use WebP only if the form explicitly lists it. If you're optimising images for your own website rather than a form, see WebP vs JPG vs PNG.
What You Lose (and What You Don't)
- Detail you won't miss: at 800 px wide, a passport-style face photo still has far more detail than a form thumbnail can show.
- Metadata: re-encoding in the browser removes EXIF metadata, including camera model and GPS location. For a photo you're sending to a stranger's server, that's a privacy bonus.
- Original file: your original is untouched. The tool creates a new file, so you can try again with different settings.
On Your Phone
The same steps work in Chrome or Safari on Android and iPhone. Tap the upload area, choose the photo from your gallery, and change the settings as above. iPhone photos are often HEIC. The compressor reads HEIC and turns it into a JPG, so you don't need to convert it first. For a detailed walkthrough of HEIC, see our guide on converting HEIC to JPG.
Frequently Asked Questions
How do I compress an image to exactly 100KB?
No compressor without a target-size mode hits an exact byte count, and you don't need it to. Forms ask for "under 100KB". Use 1280 px at quality 60 and check the result. Anything from about 50 to 90 KB passes and still looks good.
Why is my photo still too big after I lowered the quality?
Because the dimensions are still large. In my tests, a full-size 12MP photo at quality 40 was 274 KB. Set Max width/height to 1280 or 800 px. That cuts the file far more than the quality slider does.
Will compressing to 20KB make my photo blurry?
At 800 px and quality 40 you'll see some softness if you zoom in, but at the size forms display photos (usually a few hundred pixels) it looks normal. If it's visibly blocky, resize to 600 px first and use quality 60. Fewer pixels at higher quality often looks better than more pixels at very low quality.
Can I compress a PNG to 50KB?
Yes. Set Output format to JPG and use the same settings. PNG is lossless and stays large for photos. Converting it to JPG is what makes 50KB possible. Keep it as PNG only if the image needs a transparent background.
Is it safe to compress ID photos and signatures online?
With our tool the file isn't uploaded: compression happens in your browser on your own device. That's why it works for documents you'd rather not send to an unknown server. Close the tab when you're done and nothing is kept.
What size should a photo be for an online application?
There's no universal standard. Each portal sets its own rule, so read the instructions on the form. Common patterns are a KB range (such as 20–100KB), a format (JPG), and sometimes exact pixels or a passport-style ratio. The table above lets you hit almost any KB range.
Related Tools You Might Need
- Compress Image — Lower quality and max size to fit any KB limit, in bulk
- Resize Image — Set exact width and height in pixels, or scale by percentage
- Crop Image — Crop a face or signature by typing exact pixel values
- Image Converter — Turn PNG, HEIC, WebP or TIFF into JPG
- JPG to PDF — For portals that want documents as a PDF instead of an image
By Muhammad Hasnain Adam — Developer based in Karachi and the builder of Free Media Tools. I ran every setting in this guide through our own compressor on real photos before writing it down, because "just lower the quality" advice keeps failing people on upload forms.