How to Resize an Image Online for Free — Quick and Easy Guide
Images come in all sizes, but they rarely match the exact dimensions you need. Profile pictures require specific sizes, blog posts need optimized images, and social media platforms have strict dimension requirements. Resizing images incorrectly can result in distortion, pixelation, or rejected uploads. However, resizing images online has become incredibly simple and free.
In this comprehensive guide, you'll learn how to resize image online free using browser-based tools, understand when and why to resize images, discover optimal dimensions for popular platforms, and master techniques for maintaining quality during resizing. Whether you're a blogger, social media manager, or casual user, this guide provides everything you need.
Why Resize Images?
Resizing images serves multiple important purposes that affect performance, compatibility, and user experience.
Page speed optimization: Large images slow down websites significantly. A 4000 x 3000 pixel image displayed at 800 x 600 pixels still loads the full 4000 x 3000 file, wasting bandwidth and time. Resizing images to their display dimensions can reduce file sizes by 80-90%, dramatically improving page load times.
Platform requirements: Social media platforms, websites, and applications have specific dimension requirements. Instagram profile pictures must be 320 x 320 pixels, LinkedIn banners require 1584 x 396 pixels, and YouTube thumbnails need 1280 x 720 pixels. Uploading incorrectly sized images results in automatic cropping, distortion, or rejection.
Storage management: Smaller images consume less storage space on your device, cloud storage, or website hosting. Resizing images before storing them can free up significant space, especially for large photo libraries.
Email attachments: Email services limit attachment sizes. Resizing images before attaching them ensures they send successfully without hitting size limits. This is particularly important when sending multiple images.
Faster uploads: Smaller files upload faster, which matters when you're on slow connections or uploading many images. Resizing images before uploading to social media, websites, or cloud storage saves time and data.
Better user experience: Appropriately sized images load quickly and display correctly, creating positive experiences for your audience. Oversized images frustrate users with slow loading times, while undersized images appear pixelated and unprofessional.
Understanding these reasons helps you prioritize image resizing in your workflow and make informed decisions about target dimensions.
Understanding Image Dimensions and Aspect Ratios
Before resizing images, it's important to understand key concepts that affect the process.
Image dimensions are measured in pixels (width x height). A 1920 x 1080 image is 1920 pixels wide and 1080 pixels tall. Larger dimensions mean more detail but also larger file sizes.
Aspect ratio is the proportional relationship between width and height. Common aspect ratios include:
- 1:1 (Square): 1000 x 1000, 500 x 500 (social media profile pictures)
- 4:3 (Standard): 1600 x 1200, 800 x 600 (traditional photos)
- 16:9 (Widescreen): 1920 x 1080, 1280 x 720 (videos, modern displays)
- 3:2 (Photography): 3000 x 2000, 1500 x 1000 (DSLR cameras)
- 9:16 (Vertical): 1080 x 1920, 720 x 1280 (mobile, stories)
Maintaining aspect ratio prevents distortion. When you resize an image while maintaining its aspect ratio, the image scales proportionally without stretching or squashing. Most resizing tools offer a "lock aspect ratio" option that automatically adjusts height when you change width (or vice versa).
Cropping vs resizing: Resizing changes dimensions while keeping the entire image. Cropping removes parts of the image to achieve desired dimensions. Sometimes you need both—resize to get close to target dimensions, then crop to exact specifications.
Resolution vs dimensions: Resolution (DPI/PPI) matters for printing but not for digital display. A 1000 x 1000 pixel image displays the same on screen whether it's 72 DPI or 300 DPI. For web use, focus on pixel dimensions, not DPI.
Understanding these concepts helps you resize images correctly without distortion or quality loss.
Optimal Image Sizes for Common Use Cases
Different platforms and purposes require different image dimensions. Here's a comprehensive guide:
Social Media Profile Pictures:
- Facebook: 180 x 180 pixels (displays at 170 x 170)
- Instagram: 320 x 320 pixels minimum
- Twitter/X: 400 x 400 pixels
- LinkedIn: 400 x 400 pixels
- TikTok: 200 x 200 pixels
- YouTube: 800 x 800 pixels
Social Media Cover/Banner Images:
- Facebook Cover: 820 x 312 pixels
- Twitter/X Header: 1500 x 500 pixels
- LinkedIn Banner: 1584 x 396 pixels
- YouTube Banner: 2560 x 1440 pixels (safe area: 1546 x 423)
Social Media Posts:
- Instagram Feed: 1080 x 1080 pixels (square), 1080 x 1350 (portrait)
- Instagram Stories: 1080 x 1920 pixels
- Facebook Post: 1200 x 630 pixels (link preview)
- Twitter/X Post: 1200 x 675 pixels
- LinkedIn Post: 1200 x 627 pixels
- Pinterest Pin: 1000 x 1500 pixels (2:3 ratio)
Blog and Website Images:
- Featured Image: 1200 x 630 pixels (good for social sharing)
- Blog Post Image: 800 x 600 to 1200 x 800 pixels
- Thumbnail: 300 x 200 to 400 x 300 pixels
- Full-width Hero: 1920 x 1080 pixels
- Product Image: 1000 x 1000 to 2000 x 2000 pixels
Email Marketing:
- Email Header: 600 x 200 to 600 x 300 pixels
- Email Body Image: 600 pixels wide (height varies)
- Email Footer: 600 x 100 pixels
Video Thumbnails:
- YouTube: 1280 x 720 pixels (16:9 ratio)
- Vimeo: 1280 x 720 pixels
- Facebook Video: 1200 x 675 pixels
Documents and Presentations:
- PowerPoint Slide: 1920 x 1080 pixels (16:9) or 1024 x 768 (4:3)
- PDF Document: 1200 x 1600 pixels (portrait)
- Infographic: 800 x 2000+ pixels (tall format)
These dimensions are current as of 2026 but may change as platforms update their requirements. Always check platform guidelines for the most current specifications.
How to Resize Images Online for Free
Resizing images online is straightforward with the right tools. Here's a step-by-step guide:
Step 1: Choose an online image resizer Navigate to a free online image resizer like freemediatools.online/resize-image. The tool loads instantly without installation or signup requirements.
Step 2: Upload your image Click "Select Image" or drag and drop your image file into the upload area. The browser reads the file locally—it doesn't upload to a server, ensuring privacy. Supported formats typically include JPG, PNG, WebP, GIF, and others.
Step 3: Choose resizing method Select how you want to resize:
- By dimensions: Enter specific width and height in pixels
- By percentage: Scale to a percentage of original size (e.g., 50% for half size)
- By preset: Choose from common sizes (Instagram, Facebook, etc.)
Step 4: Set dimensions Enter your target dimensions. Most tools offer a "lock aspect ratio" option (usually a chain link icon) that maintains proportions automatically. With aspect ratio locked, changing width automatically adjusts height proportionally.
Step 5: Preview (if available) Some tools show a preview of the resized image. Check that the image looks correct and isn't distorted or pixelated.
Step 6: Process and download Click "Resize Image" to process. The resizing happens instantly in your browser. Click "Download" to save the resized image to your device.
Step 7: Verify results Open the resized image and verify dimensions are correct. Check that quality is acceptable and the image displays as expected.
This process takes less than a minute for most images and works on any device with a modern web browser.
Resizing Without Losing Quality
Maintaining image quality during resizing requires understanding how resizing affects images.
Downscaling (making images smaller): Downscaling generally preserves quality well because you're removing pixels. The key is using proper resampling algorithms:
- Bicubic: Best for most photographs, provides smooth results
- Lanczos: Excellent for detailed images, slightly sharper than bicubic
- Bilinear: Faster but lower quality, acceptable for thumbnails
Most online resizers use bicubic or lanczos automatically, providing excellent results.
Upscaling (making images larger): Upscaling is more challenging because you're creating pixels that don't exist in the original. This can result in blurriness or pixelation. Best practices for upscaling:
- Avoid upscaling more than 20-30% when possible
- Use AI-powered upscaling tools for better results
- Start with the highest quality source image available
- Accept that some quality loss is inevitable
Quality preservation tips:
- Always work from original, unedited images when possible
- Resize in one step rather than multiple steps
- Don't resize already-compressed images repeatedly
- Save resized images in appropriate formats (JPG for photos, PNG for graphics)
- Consider compressing images after resizing to reduce file size further
Format considerations:
- Save photographs as JPG with quality 80-90
- Save graphics and logos as PNG to preserve sharp edges
- Consider WebP format for web use (smaller files, excellent quality)
- Use image converter to change formats if needed
By following these practices, you can resize images with minimal quality loss, ensuring professional results.
Batch Resizing Multiple Images
When you need to resize many images to the same dimensions, batch processing saves significant time.
When to use batch resizing:
- Preparing product photos for e-commerce
- Optimizing blog post images
- Creating social media content libraries
- Processing photo albums for web galleries
- Standardizing image sizes across a website
Batch resizing methods:
Online batch tools: Some online image resizers support batch processing, allowing you to upload multiple images and resize them all at once with the same settings. This is convenient for small to medium batches (10-50 images).
Desktop software: For large batches (100+ images), desktop software like XnConvert (free), IrfanView (Windows), or Preview (Mac) offers more efficient batch processing with advanced options.
Automated workflows: For regular batch resizing needs, consider setting up automated workflows using tools like Photoshop actions, GIMP scripts, or command-line tools like ImageMagick.
Batch resizing workflow:
- Organize images in a dedicated folder
- Determine target dimensions for all images
- Choose batch processing tool
- Configure resize settings (dimensions, quality, format)
- Process all images
- Verify a few samples to ensure quality
- Save originals separately before replacing
Batch resizing is essential for anyone working with large image libraries or managing content for websites and social media.
Cropping vs Resizing: When to Use Each
Understanding the difference between cropping and resizing helps you choose the right approach.
Resizing changes image dimensions while keeping the entire image. The image scales proportionally (if aspect ratio is locked) or stretches/squashes (if aspect ratio is not locked). Use resizing when:
- You want to keep the entire image
- The image already has the correct composition
- You need to reduce file size
- The target aspect ratio matches your source image
Cropping removes parts of the image to achieve desired dimensions or composition. Use cropping when:
- The image has unwanted elements at edges
- You need to change aspect ratio (e.g., landscape to square)
- You want to focus on a specific part of the image
- Platform requirements demand specific dimensions that don't match your image
Combined approach: Often, the best results come from combining both:
- Crop to desired composition and aspect ratio
- Resize to exact dimensions needed
For example, to create an Instagram post from a landscape photo:
- Crop to 4:5 aspect ratio (1080 x 1350)
- Resize to exactly 1080 x 1350 pixels
Our image cropper tool makes it easy to crop images to specific aspect ratios before resizing.
Mobile vs Desktop Image Resizing
Both mobile and desktop devices can resize images, but each has advantages and limitations.
Desktop resizing advantages:
- Faster processing for large images
- Easier to work with multiple images
- Better for batch processing
- More screen space for previewing results
- Can handle very large files more reliably
Mobile resizing advantages:
- Convenient for on-the-go editing
- Perfect for social media content creation
- Can resize and upload directly from phone
- Ideal for quick edits and sharing
- No need to transfer images to computer
Mobile resizing tips:
- Use browser-based tools that work on mobile
- Resize images before uploading to save mobile data
- Be patient with large files—mobile processors are slower
- Close other apps to free up memory
- Use Wi-Fi for uploading resized images when possible
Cross-device workflow: Many users benefit from a hybrid approach:
- Capture photos on mobile
- Transfer to desktop for batch processing and detailed editing
- Resize and optimize on desktop
- Upload from desktop or transfer back to mobile
Choose the approach that fits your workflow and the tools available to you.
Common Image Resizing Mistakes to Avoid
Avoid these frequent errors when resizing images:
Not maintaining aspect ratio: Resizing without locking aspect ratio creates distorted, stretched images that look unprofessional. Always lock aspect ratio unless you specifically need to change it.
Upscaling low-quality images: Making a small, low-quality image larger doesn't improve quality—it makes pixelation more visible. Always start with the highest quality source available.
Resizing multiple times: Each resize operation can degrade quality slightly. Resize once from the original rather than resizing an already-resized image.
Using wrong file format: Saving photographs as PNG creates unnecessarily large files. Saving graphics with text as JPG creates compression artifacts. Match format to content type.
Ignoring file size: Resizing dimensions without checking file size can result in images that are still too large. After resizing, compress images if file size is still too large.
Not testing on target platform: Always verify resized images display correctly on the intended platform. Upload a test image before processing your entire library.
Deleting originals: Never delete original images until you've verified resized versions meet your needs. Storage is cheap; lost originals are irreplaceable.
Over-optimizing: Resizing to extremely small dimensions or using very low quality settings creates poor user experiences. Find the balance between file size and acceptable quality.
By avoiding these mistakes, you'll achieve professional results consistently.
Frequently Asked Questions
How do I resize an image without losing quality?
To minimize quality loss, always resize from the highest quality source image available, resize in one step rather than multiple steps, and use appropriate resampling algorithms (bicubic or lanczos). When downscaling (making images smaller), quality loss is minimal. When upscaling (making images larger), some quality loss is inevitable—avoid upscaling more than 20-30% when possible.
What is the best free online image resizer?
The best free online image resizer offers easy-to-use interface, maintains image quality, processes images locally for privacy, supports multiple formats, and requires no signup. Our free image resizer meets all these criteria, processing images entirely in your browser without uploads, watermarks, or limitations.
Can I resize images on my phone?
Yes, you can resize images on smartphones using browser-based tools that work on mobile devices. Navigate to an online image resizer in your mobile browser, upload your image, set dimensions, and download the result. Mobile processing is slower than desktop for large images, but works well for typical social media and web images.
What size should I resize images for websites?
For website images, resize based on display size. Hero images: 1920 x 1080 pixels, blog post images: 800-1200 pixels wide, thumbnails: 300-400 pixels wide, product images: 1000-2000 pixels square. Always create responsive versions at multiple sizes for different devices. Larger images should be compressed after resizing to optimize file size.
Does resizing an image reduce file size?
Yes, making images smaller (downscaling) reduces file size because there are fewer pixels to store. However, the file size reduction depends on both dimensions and compression. A 4000 x 3000 pixel image resized to 1000 x 750 pixels might reduce file size by 80-90%. For maximum file size reduction, resize first, then compress the image.
Conclusion
Resizing images online for free has never been easier thanks to modern browser-based tools. Whether you need to resize images for social media, optimize website performance, create email attachments, or meet platform requirements, online image resizers provide fast, convenient solutions without software installation or costs.
The key to successful image resizing is understanding your target dimensions, maintaining aspect ratios to prevent distortion, and choosing appropriate quality settings for your use case. By following the guidelines and best practices in this guide, you can resize images professionally while maintaining quality and optimizing file sizes.
Remember that resizing is often just one step in image optimization. Combining resizing with compression and format conversion creates the best results for web use. Start with high-quality source images, resize to appropriate dimensions, compress to reduce file size, and convert to modern formats like WebP for optimal performance.
Ready to resize your images? Try our free online image resizer now—no signup required, no watermarks, completely free, and your images never leave your device. Resize images in seconds!
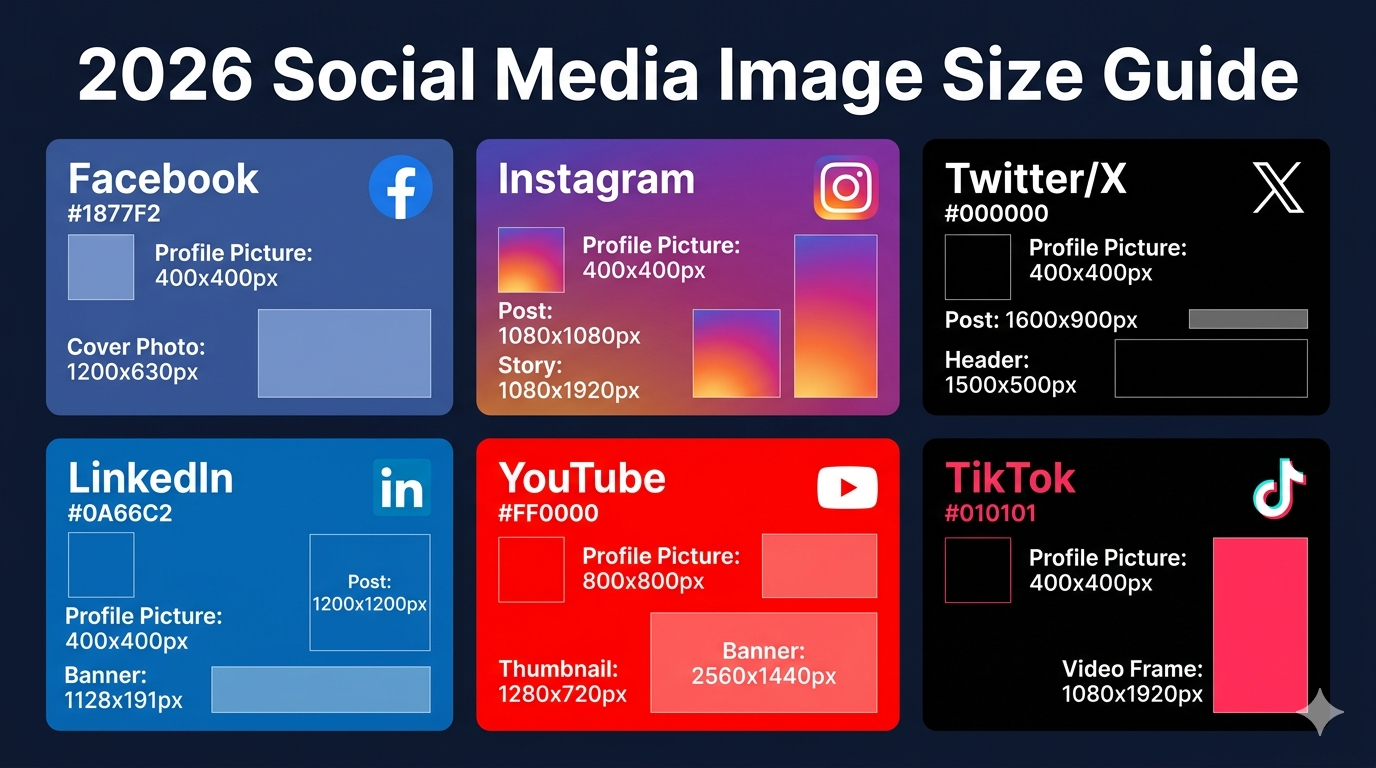
Image Suggestions:
- Dimension Guide: Visual chart showing optimal image sizes for popular social media platforms (Alt text: "Infographic showing recommended image dimensions for Facebook, Instagram, Twitter, LinkedIn, and YouTube")
- Before/After Comparison: Same image shown at different sizes with file size information (Alt text: "Image comparison showing original 4000x3000 photo (3.2MB) resized to 1200x900 (280KB) with maintained quality")