Need to add subtitles to your video but don't want to install expensive software? Whether you're creating content for YouTube, making videos accessible for deaf viewers, or adding captions for social media, adding subtitles online is now easier than ever. This guide shows you exactly how to add subtitles to video for free using browser-based tools.
Quick Answer
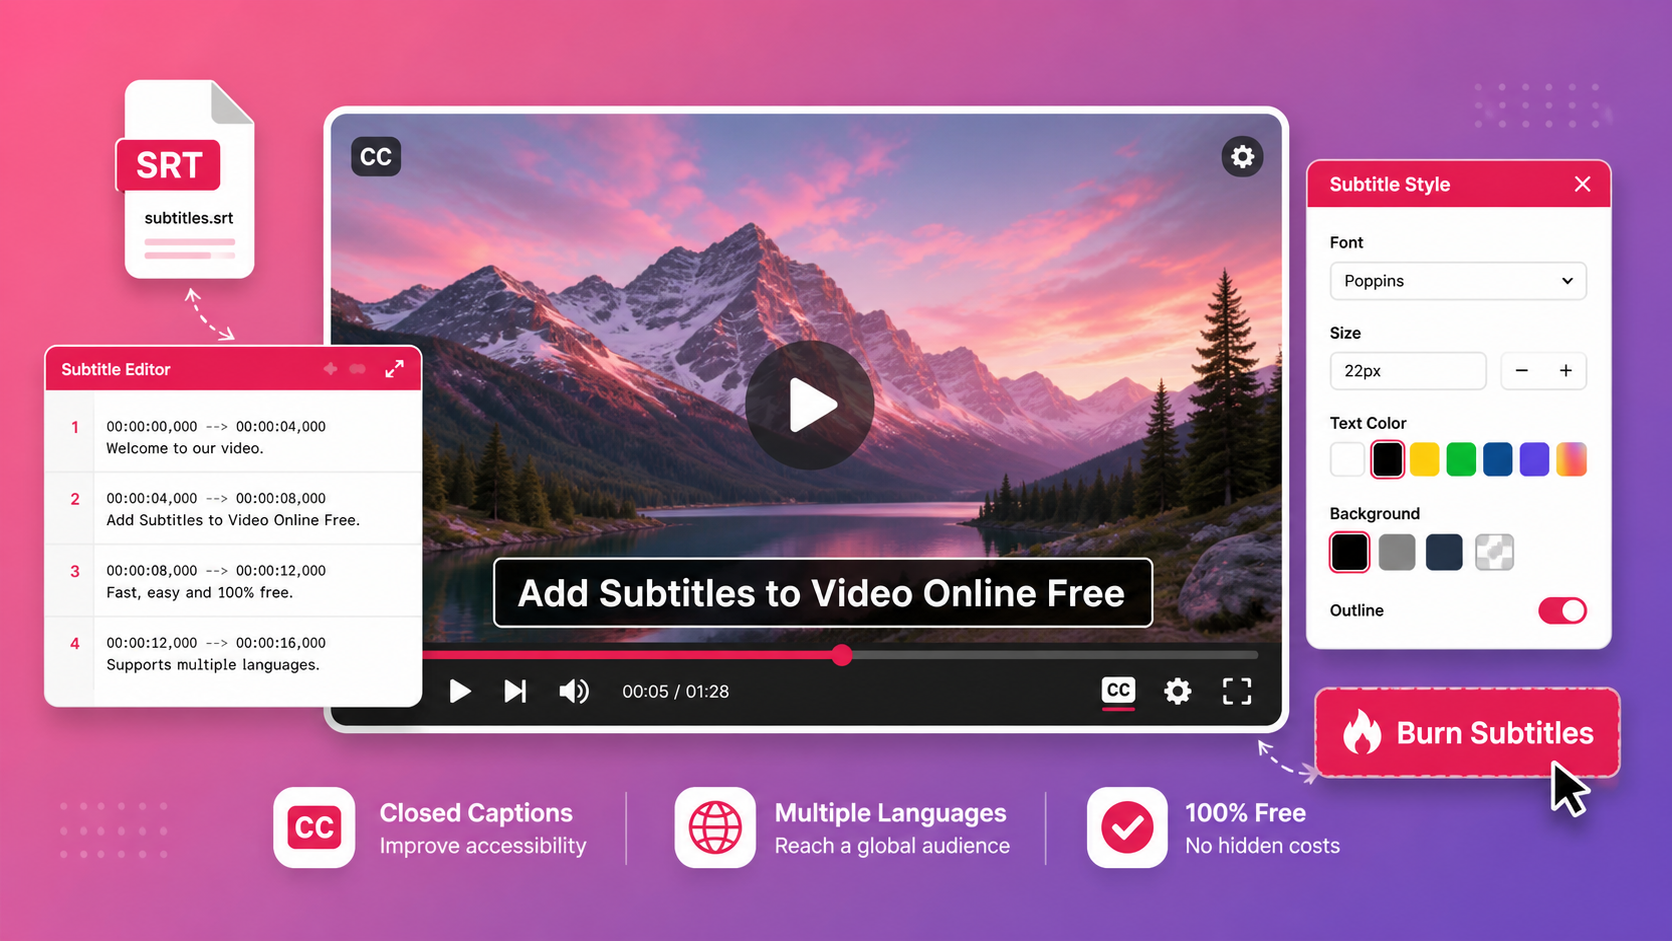
Use Free Media Tools' Subtitle Tool to add subtitles to video online for free. Upload your video and SRT file (or create subtitles manually), customize the appearance, and burn them permanently into your video. Works entirely in your browser with complete privacy — no signup required.
Why Add Subtitles to Videos?
1. Accessibility for Deaf and Hard of Hearing
85% of Facebook videos are watched without sound. Subtitles make your content accessible to:
- Deaf and hard of hearing viewers
- People in sound-sensitive environments (libraries, offices, public transport)
- Non-native speakers learning the language
- Viewers who prefer reading along
2. Better Engagement and Retention
Videos with subtitles get:
- 80% higher completion rates
- 40% more views
- 16% higher click-through rates
- Better SEO rankings (search engines can index subtitle text)
3. Social Media Requirements
Many platforms favor or require subtitles:
- Instagram/TikTok: 85% watch without sound
- Facebook: Auto-plays muted
- LinkedIn: Professional content needs captions
- YouTube: Subtitles improve searchability
4. International Audience
Subtitles help non-native speakers understand your content, expanding your global reach.
Types of Subtitles: Soft vs Hard (Burned-In)
Soft Subtitles (Separate File)
What they are: Subtitle file (SRT, VTT) uploaded separately from video
Advantages:
- Can be turned on/off by viewer
- Easy to edit or update
- Multiple language options
- Smaller file size
Disadvantages:
- Not all platforms support them
- May not display correctly
- Can be removed or lost
Best for: YouTube, streaming platforms, professional distribution
Hard Subtitles (Burned-In)
What they are: Subtitles permanently embedded into video pixels
Advantages:
- Always visible (can't be turned off)
- Work on all platforms
- Guaranteed to display correctly
- No separate file needed
Disadvantages:
- Cannot be edited after burning
- Slightly larger file size
- Cannot be turned off
Best for: Social media (Instagram, TikTok, Facebook), sharing videos, accessibility compliance
Our tool creates hard subtitles — perfect for social media and guaranteed visibility.
How to Add Subtitles to Video Online (Step-by-Step)
Method 1: Using SRT File (Recommended)
Best for: Videos with existing transcripts, YouTube videos, professional content
Step 1: Get Your SRT File
You can obtain SRT files from:
- YouTube Studio: Download auto-generated subtitles for your videos
- Transcription services: Rev.com, Otter.ai, Descript
- Create manually: Use text editor (see format below)
- AI tools: Whisper AI, Happy Scribe
Step 2: Upload Video and SRT
- Go to freemediatools.online/add-subtitles-to-video
- Click "Select Video" or drag and drop your video file
- Click "Upload SRT File" and select your subtitle file
- Preview subtitles on video timeline
Step 3: Customize Appearance
Adjust subtitle styling:
- Font: Arial, Helvetica, Times New Roman, etc.
- Size: 24-48px (32px recommended)
- Color: White with black outline (best readability)
- Position: Bottom center (standard), top, or custom
- Background: Transparent, semi-transparent black, or solid
Step 4: Burn Subtitles
- Click "Burn Subtitles to Video"
- Wait for processing (2-5 minutes for 5-minute video)
- Download your subtitled video
- Upload to YouTube, Instagram, or share
Method 2: Manual Subtitle Creation
Best for: Short videos, quick captions, videos without transcripts
Step 1: Upload Video
- Go to freemediatools.online/add-subtitles-to-video
- Upload your video file
- Select "Create Subtitles Manually"
Step 2: Add Subtitle Entries
For each subtitle:
- Play video to desired timestamp
- Click "Add Subtitle"
- Enter start time (00:00:05.000)
- Enter end time (00:00:08.000)
- Type subtitle text
- Repeat for all subtitles
Step 3: Preview and Adjust
- Play video to check timing
- Edit text for accuracy
- Adjust timing if subtitles appear too early/late
- Check for typos
Step 4: Customize and Burn
Same as Method 1 — customize appearance and burn subtitles into video.
SRT File Format Explained
SRT (SubRip) is the most common subtitle format. Here's the structure:
1
00:00:00,000 --> 00:00:03,500
Welcome to our video tutorial on adding subtitles.

2
00:00:03,500 --> 00:00:07,000
Today we'll learn how to make videos accessible.

3
00:00:07,000 --> 00:00:10,500
Subtitles help deaf viewers and improve engagement.
Format breakdown:
- Line 1: Subtitle number (sequential)
- Line 2: Timestamp (start --> end) in HH:MM:SS,milliseconds
- Line 3: Subtitle text (can be multiple lines)
- Line 4: Blank line separator
Creating SRT Files Manually
Using Notepad/TextEdit:
- Open text editor
- Type subtitles in SRT format (see above)
- Save as "subtitles.srt" (not .txt)
- Ensure UTF-8 encoding
Using Subtitle Edit (Free Software):
- Download Subtitle Edit (free, open-source)
- Create new subtitle project
- Add entries with timestamps
- Export as SRT
Using Online Tools:
- Subtitle Tools
- Kapwing Subtitle Maker
- VEED.io (limited free)
Real-World Example: Educational YouTube Channel
A science educator creates 10-minute explainer videos for YouTube.
Problem:
- Videos had no subtitles
- Deaf students couldn't access content
- Non-native English speakers struggled
- Lower engagement and watch time
Solution:
- Downloaded YouTube auto-generated subtitles (SRT)
- Edited for accuracy (auto-captions had errors)
- Used our tool to burn subtitles into video
- Re-uploaded to YouTube with burned-in captions
Results:
| Metric | Before | After | Improvement |
|---|---|---|---|
| Average watch time | 4.2 min | 6.8 min | 62% increase |
| Completion rate | 42% | 68% | 62% increase |
| Comments from deaf viewers | 0 | 50+ | Accessibility achieved |
| International views | 15% | 34% | 127% increase |
| Engagement rate | 3.2% | 5.7% | 78% increase |
Key insight: Burned-in subtitles ensured all viewers saw captions, regardless of platform or device settings.
Best Practices for Video Subtitles
1. Timing and Duration
Reading speed: 160-180 words per minute (2-3 words per second)
Subtitle duration:
- Minimum: 1 second (enough time to read)
- Maximum: 7 seconds (avoid long blocks of text)
- Ideal: 2-5 seconds per subtitle
Timing rules:
- Subtitles should appear slightly before speech
- Remove 0.5 seconds after speech ends
- Don't overlap scene changes
2. Text Formatting
Line length: Maximum 42 characters per line (2 lines max)
Good example:
Welcome to our channel.
Today we're learning about subtitles.
Bad example:
Welcome to our channel where we teach you everything about video editing and subtitles.
Capitalization:
- Use sentence case (not ALL CAPS)
- Capitalize proper nouns
- Use italics for emphasis or off-screen voices
3. Visual Appearance
Font choice:
- Best: Arial, Helvetica, Roboto (sans-serif, clean)
- Avoid: Decorative fonts, script fonts, thin fonts
Color and contrast:
- Best: White text with 2-3px black outline
- Alternative: Yellow text with black outline (classic)
- Avoid: Colors that blend with video background
Size:
- Desktop: 32-40px
- Mobile: 24-32px
- Adjust based on video resolution
Position:
- Standard: Bottom center, 10% from bottom edge
- Alternative: Top center (if bottom has important visuals)
- Avoid: Covering faces or important content
4. Content Guidelines
Accuracy:
- Match spoken words exactly (don't paraphrase)
- Include relevant sound effects: [music], [laughter], [door slams]
- Indicate speaker changes: "John: Hello" or ">> Hello"
Punctuation:
- Use proper punctuation for readability
- Avoid excessive exclamation marks!!!
- Use ellipsis (...) for trailing off
Editing:
- Remove filler words (um, uh, like) unless important
- Fix grammatical errors in speech
- Keep profanity or censor based on audience
Subtitle Styling Examples
Style 1: Classic (Recommended)
- Font: Arial Bold
- Size: 32px
- Color: White (#FFFFFF)
- Outline: 2px black
- Background: None
- Position: Bottom center
Best for: YouTube, educational content, professional videos
Style 2: Social Media
- Font: Montserrat Bold
- Size: 36px
- Color: Yellow (#FFFF00)
- Outline: 3px black
- Background: Semi-transparent black box
- Position: Center or top
Best for: Instagram, TikTok, Facebook, viral content
Style 3: Accessibility Focus
- Font: Arial Bold
- Size: 40px
- Color: White (#FFFFFF)
- Outline: 3px black
- Background: Semi-transparent black (#000000 50% opacity)
- Position: Bottom center
Best for: Accessibility compliance, educational institutions, government content
Style 4: Minimalist
- Font: Helvetica
- Size: 28px
- Color: White (#FFFFFF)
- Outline: 1px gray
- Background: None
- Position: Bottom center
Best for: Artistic content, documentaries, cinematic videos
What to Avoid: Subtitle Mistakes
1. Subtitles Too Fast
Viewers can't read subtitles that disappear in under 1 second.
Solution: Minimum 1 second display time, ideally 2-5 seconds.
2. Too Much Text
Long paragraphs are overwhelming and unreadable.
Solution: Maximum 2 lines, 42 characters per line. Break into multiple subtitles.
3. Poor Timing
Subtitles appearing too early or too late confuse viewers.
Solution: Subtitles should appear 0.2 seconds before speech, disappear 0.5 seconds after.
4. Low Contrast
Light text on light backgrounds or dark text on dark backgrounds is unreadable.
Solution: Always use white text with black outline, or vice versa.
5. Covering Important Visuals
Subtitles blocking faces, products, or key visuals frustrate viewers.
Solution: Position subtitles in empty space. Move to top if bottom is crowded.
6. Inconsistent Styling
Changing fonts, colors, or sizes mid-video looks unprofessional.
Solution: Choose one style and stick with it throughout the video.
7. Ignoring Sound Effects
Deaf viewers miss important audio cues like [doorbell], [explosion], [music].
Solution: Include relevant sound effects in brackets.
Platform-Specific Subtitle Guidelines
YouTube
Format: SRT or VTT (soft subtitles) or burned-in
Recommendation: Upload SRT separately for searchability, or burn-in for guaranteed visibility
Styling: YouTube's default styling is good, but burned-in gives you control
Languages: Support multiple languages with separate SRT files
Instagram/Facebook
Format: Burned-in subtitles (hard subtitles)
Recommendation: Always burn subtitles — 85% watch without sound
Styling: Bold, high-contrast, center or top position
Duration: Keep subtitles brief for fast-paced content
TikTok
Format: Burned-in subtitles or TikTok's auto-captions
Recommendation: Burn custom subtitles for branding and accuracy
Styling: Large, bold, colorful, center position
Trend: Word-by-word highlighting (requires advanced editing)
Format: Burned-in subtitles
Recommendation: Professional styling, accurate captions
Styling: Clean, readable, bottom position
Importance: Critical for professional content
Twitter/X
Format: Burned-in subtitles
Recommendation: Essential for engagement
Styling: High contrast, readable on mobile
Duration: Keep videos under 2 minutes
Frequently Asked Questions
How do I add subtitles to a video for free?
Use our free subtitle tool to add subtitles online. Upload your video and SRT file (or create subtitles manually), customize appearance, and burn them into your video. No signup required, completely free.
What is an SRT file?
SRT (SubRip) is a text file containing subtitle text with timestamps. It's the most common subtitle format, supported by YouTube, Netflix, and most video platforms. You can create SRT files with text editors or subtitle software.
Can I add subtitles without an SRT file?
Yes! Our tool includes a manual subtitle editor. Upload your video, play it, and add subtitle entries with timestamps directly in the browser. Perfect for short videos or quick captions.
Are burned-in subtitles permanent?
Yes, burned-in (hardcoded) subtitles are permanently embedded into video pixels. They cannot be turned off or edited after burning. This ensures all viewers see subtitles regardless of platform or device.
How long does it take to burn subtitles into video?
Processing time depends on video length and resolution. A 5-minute 1080p video typically takes 2-3 minutes to process. Longer or higher-resolution videos take proportionally longer.
What's the best subtitle font?
Arial Bold or Helvetica Bold are best for subtitles. They're clean, readable, and work well at small sizes. Avoid decorative or script fonts that are hard to read quickly.
What color should subtitles be?
White text with a 2-3px black outline is the most readable combination. It works on any background. Yellow with black outline is a classic alternative. Avoid colors that blend with your video content.
Do subtitles help with SEO?
Yes! Search engines can index subtitle text, improving video searchability. YouTube uses subtitle content for search rankings and recommendations. Subtitles also increase watch time, which boosts SEO.
Can I add subtitles in multiple languages?
For burned-in subtitles, you need to create separate videos for each language. For soft subtitles (YouTube), you can upload multiple SRT files in different languages, allowing viewers to choose.
How do I download YouTube subtitles?
In YouTube Studio, go to your video → Subtitles → Click the three dots next to your language → Download. This gives you an SRT file you can edit and burn into videos.
Advanced Subtitle Techniques
1. Color-Coded Speakers
For videos with multiple speakers, use different colors:
Speaker 1 (John): White text
Speaker 2 (Sarah): Yellow text
Narrator: Cyan text
This helps viewers follow conversations.
2. Sound Effect Descriptions
Include important audio cues for deaf viewers:
[upbeat music playing]
[door creaks open]
[audience applauds]
[phone vibrates]
3. Speaker Identification
For interviews or multi-person videos:
John: Welcome to the show.
Sarah: Thanks for having me!
Or use position (left speaker = left subtitle, right speaker = right subtitle).
4. Emphasis and Tone
Use formatting to convey emotion:
- Bold: emphasis or strong emphasis
- Italics: sarcasm or thinking
- ALL CAPS: SHOUTING (use sparingly)
5. Lyrics and Music
For music videos or songs:
♪ We're no strangers to love ♪
♪ You know the rules and so do I ♪
Use music notes (♪) to indicate singing.
Tools and Resources
Free Subtitle Creation Tools
Subtitle Edit (Desktop):
- Free, open-source
- Windows, Mac, Linux
- Advanced features
- Download: nikse.dk/subtitleedit
Aegisub (Desktop):
- Free, open-source
- Professional-grade
- Timing and styling tools
- Download: aegisub.org
YouTube Studio (Online):
- Free for YouTube creators
- Auto-generates subtitles
- Edit and download SRT
- Access: studio.youtube.com
Transcription Services
Free/Cheap:
- YouTube auto-captions (free, 80-90% accurate)
- Otter.ai (free tier: 600 min/month)
- Google Docs voice typing (free, manual)
Paid (High Accuracy):
- Rev.com ($1.50/minute, 99% accurate)
- Descript ($12/month, includes editing)
- Happy Scribe ($0.20/minute)
AI Subtitle Tools
Whisper AI (Free):
- OpenAI's speech recognition
- 95%+ accuracy
- Requires technical setup
- Download: github.com/openai/whisper
Auto-Subtitle (Free):
- Command-line tool using Whisper
- Generates SRT automatically
- Download: github.com/m1guelpf/auto-subtitle
Accessibility Compliance
WCAG 2.1 Guidelines
For accessibility compliance, subtitles must:
Level A (Minimum):
- Provide captions for all pre-recorded audio
- Include all speech and relevant sounds
- Synchronize with audio
Level AA (Recommended):
- Provide captions for live audio
- Ensure readability (contrast, size)
- Allow user control (for soft subtitles)
Level AAA (Enhanced):
- Provide extended audio descriptions
- Sign language interpretation
- Multiple caption options
Legal Requirements
United States:
- ADA requires captions for public content
- FCC requires captions for broadcast TV
- Section 508 for government content
European Union:
- European Accessibility Act
- Requires captions for public services
United Kingdom:
- Equality Act 2010
- Requires reasonable adjustments
Recommendation: Always add subtitles to public-facing content for legal compliance and inclusivity.
Subtitle Workflow for Content Creators
For YouTube Creators
- Record video with clear audio
- Upload to YouTube as unlisted
- Wait for auto-captions (10-30 minutes)
- Download SRT from YouTube Studio
- Edit SRT for accuracy (fix errors)
- Burn subtitles using our tool
- Re-upload final video with burned-in captions
- Also upload SRT separately for searchability
For Social Media Creators
- Record video with clear audio
- Transcribe using Otter.ai or manual typing
- Create SRT with timestamps
- Burn subtitles using our tool
- Customize styling for platform (bold, colorful for TikTok)
- Export and upload to Instagram, TikTok, Facebook
For Professional Content
- Record video with professional audio
- Send to transcription service (Rev.com)
- Receive accurate SRT (99% accuracy)
- Review and edit for style consistency
- Burn subtitles with professional styling
- Quality check on multiple devices
- Deliver final video to client
Related Tools You Might Need
-
Video Compressor — Reduce video file size after adding subtitles for faster uploads to social media.
-
Video Trimmer — Cut unnecessary parts before adding subtitles to save time on subtitle creation.
-
Video Converter — Convert videos to MP4 format for best compatibility with subtitle tools.
Troubleshooting Common Issues
Issue 1: Subtitles Out of Sync
Cause: Incorrect timestamps in SRT file
Solution:
- Open SRT in text editor
- Adjust timestamps (add/subtract seconds)
- Re-upload and burn again
Issue 2: Subtitles Not Appearing
Cause: SRT file format error or encoding issue
Solution:
- Check SRT format (see format section above)
- Ensure UTF-8 encoding (not ANSI)
- Remove special characters
- Validate SRT using online validator
Issue 3: Text Unreadable
Cause: Poor color choice or small font
Solution:
- Use white text with black outline
- Increase font size to 32-40px
- Add semi-transparent background
Issue 4: Subtitles Covering Important Content
Cause: Default bottom position blocks visuals
Solution:
- Move subtitles to top position
- Adjust vertical position manually
- Consider video composition when filming
Issue 5: Processing Takes Too Long
Cause: Large video file or high resolution
Solution:
- Compress video first using our compressor
- Reduce resolution to 1080p if higher
- Use faster device or better internet
Conclusion
Adding subtitles to videos is no longer optional — it's essential for accessibility, engagement, and reach. Whether you're creating content for YouTube, social media, or professional distribution, subtitles make your videos accessible to millions of additional viewers.
Use Free Media Tools' Subtitle Tool to add subtitles online for free. Upload your video and SRT file (or create subtitles manually), customize the appearance, and burn them permanently into your video. No signup required, completely free, and 100% private — all processing happens in your browser.
Start making your videos accessible today. Your deaf and hard-of-hearing viewers will thank you, and your engagement metrics will improve dramatically.
By Muhammad Hasnain Adam — Full-stack developer and creator of Free Media Tools. I built this platform to make video editing accessible to everyone, ensuring content creators can reach wider audiences without expensive software or technical barriers. Accessibility matters, and subtitles are a crucial step toward inclusive content.