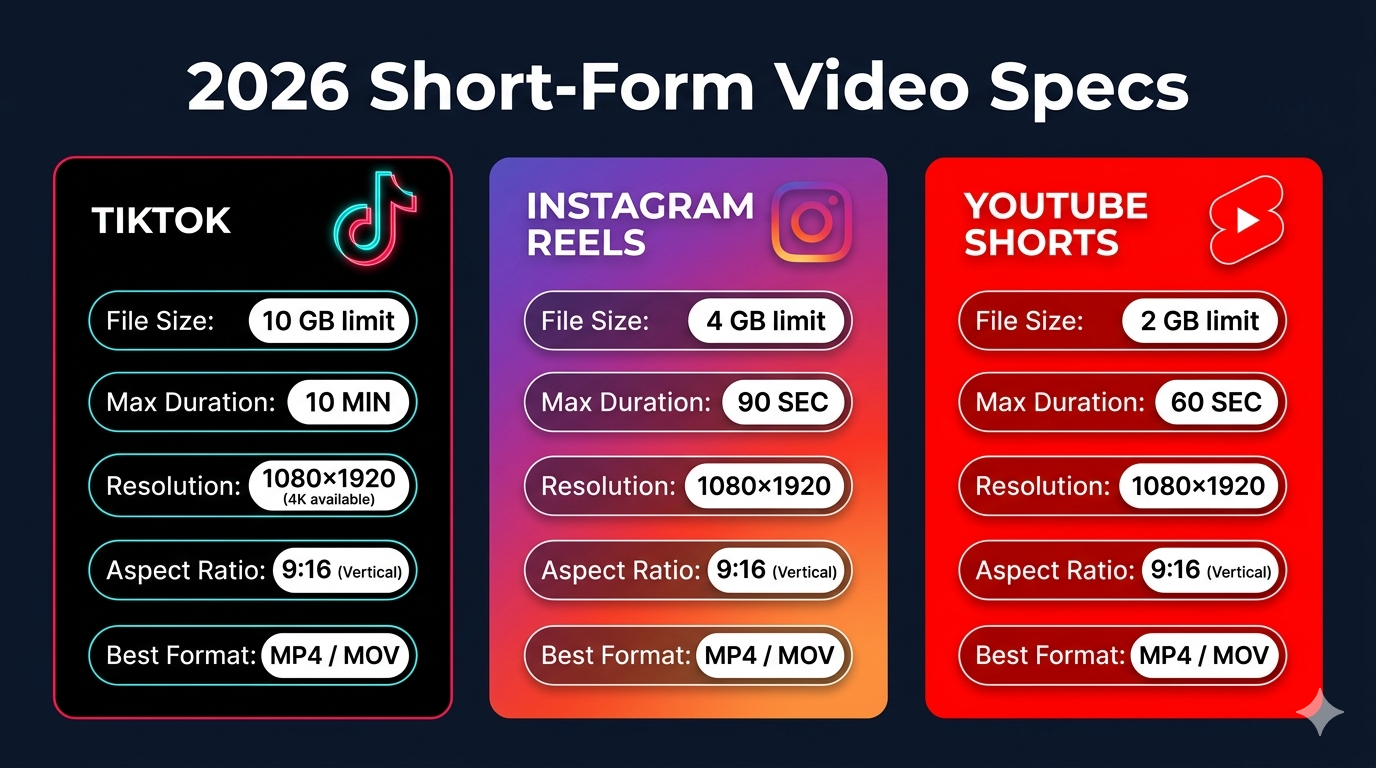
Uploading videos to TikTok or Instagram Reels only to see "file too large" or "invalid format" errors is frustrating. Each platform has specific requirements for video size, resolution, duration, and format. Understanding these specifications ensures your content uploads successfully and looks great to your audience.
In this comprehensive 2026 guide, you'll find the exact TikTok video size limit, Instagram Reels specifications, and requirements for other major social platforms. You'll also learn how to optimize your videos to meet these requirements while maintaining quality. Whether you're a content creator, marketer, or casual user, this guide has everything you need.
TikTok Video Size Limits and Specifications
TikTok has specific requirements that all uploaded videos must meet. Exceeding these limits will cause upload failures or automatic rejection.
File size limit: Maximum 287.6 MB on iOS and 72 MB on Android. This significant difference between platforms means you should optimize for the lower Android limit to ensure compatibility across all devices.
Video duration:
- Standard videos: 10 minutes maximum
- TikTok Stories: 15 seconds maximum
- Minimum duration: 3 seconds
Resolution requirements:
- Recommended: 1080 x 1920 pixels (9:16 aspect ratio)
- Minimum: 720 x 1280 pixels
- Maximum: 1080 x 1920 pixels
- Aspect ratio: 9:16 (vertical) is strongly recommended
Format and codec:
- Supported formats: MP4, MOV, MPEG, AVI, WebM, 3GP
- Recommended format: MP4 with H.264 codec
- Frame rate: 30fps or 60fps (30fps recommended for most content)
Audio specifications:
- Supported formats: MP3, WAV, M4A
- Bitrate: 128 kbps minimum, 192 kbps recommended
- Sample rate: 44.1 kHz or 48 kHz
TikTok's algorithm favors videos that meet these specifications exactly. Videos that require conversion or processing may experience quality degradation or delayed publishing. For best results, always export your videos in the recommended format before uploading.
Instagram Reels Video Requirements
Instagram Reels has similar but distinct requirements from TikTok. Understanding these differences helps you optimize content for both platforms efficiently.
File size limit: Maximum 4 GB per video. This is significantly larger than TikTok's limit, giving you more flexibility with quality settings.
Video duration:
- Maximum: 90 seconds (as of 2026)
- Minimum: 3 seconds
- Optimal engagement: 15-30 seconds
Resolution requirements:
- Recommended: 1080 x 1920 pixels (9:16 aspect ratio)
- Minimum: 540 x 960 pixels
- Aspect ratio: 9:16 (vertical) required for full-screen display
- Square (1:1) and landscape (16:9) videos are supported but display smaller
Format and codec:
- Supported formats: MP4, MOV
- Recommended: MP4 with H.264 codec
- Frame rate: 23fps to 60fps (30fps recommended)
- Bitrate: 5-10 Mbps for 1080p
Audio specifications:
- Supported formats: AAC audio codec
- Bitrate: 128 kbps minimum
- Stereo audio recommended
Instagram processes videos after upload, which can reduce quality. Uploading videos that already meet specifications minimizes quality loss during processing. If your video exceeds the file size limit, you'll need to compress video online before uploading.
YouTube Shorts Video Specifications
YouTube Shorts competes directly with TikTok and Reels, offering its own set of requirements.
File size limit: Maximum 256 GB (same as regular YouTube videos, though Shorts are much shorter)
Video duration:
- Maximum: 60 seconds
- Minimum: No official minimum, but 15+ seconds recommended for algorithm
Resolution requirements:
- Recommended: 1080 x 1920 pixels (9:16 aspect ratio)
- Minimum: 720 x 1280 pixels
- Supports up to 4K resolution (2160 x 3840 pixels)
Format and codec:
- Recommended: MP4 with H.264 codec
- Frame rate: 24fps, 30fps, or 60fps
- Bitrate: 8-12 Mbps for 1080p
Audio specifications:
- AAC codec recommended
- Bitrate: 128-192 kbps
- Sample rate: 48 kHz
YouTube Shorts has the most lenient file size limits, making it easier to upload high-quality content. However, the 60-second duration limit requires careful editing to convey your message concisely.
Facebook and Facebook Reels Requirements
Facebook supports both traditional video posts and Reels, each with different specifications.
Facebook Reels:
- File size: Maximum 4 GB
- Duration: 3-90 seconds
- Resolution: 1080 x 1920 pixels recommended
- Format: MP4 or MOV
- Aspect ratio: 9:16 (vertical)
Facebook Video Posts:
- File size: Maximum 10 GB
- Duration: Up to 240 minutes
- Resolution: 1080p recommended, up to 4K supported
- Format: MP4 or MOV
- Aspect ratio: 16:9 (landscape), 1:1 (square), or 9:16 (vertical)
Facebook's video processing is more aggressive than other platforms, often reducing quality significantly. Uploading higher-quality source files helps maintain acceptable quality after processing. For more details, check our guide on compressing videos for Facebook.
Complete Social Media Video Specs Comparison Table
Here's a comprehensive comparison of video requirements across major platforms:
| Platform | Max File Size | Max Duration | Recommended Resolution | Aspect Ratio | Format |
|---|---|---|---|---|---|
| TikTok | 72 MB (Android) / 287.6 MB (iOS) | 10 minutes | 1080 x 1920 | 9:16 | MP4 |
| Instagram Reels | 4 GB | 90 seconds | 1080 x 1920 | 9:16 | MP4 |
| YouTube Shorts | 256 GB | 60 seconds | 1080 x 1920 | 9:16 | MP4 |
| Facebook Reels | 4 GB | 90 seconds | 1080 x 1920 | 9:16 | MP4 |
| Snapchat | 1 GB | 60 seconds | 1080 x 1920 | 9:16 | MP4 |
| Twitter/X | 512 MB | 2 minutes 20 seconds | 1920 x 1080 | 16:9 | MP4 |
| 5 GB | 10 minutes | 1920 x 1080 | 16:9 | MP4 |
This table shows that TikTok has the most restrictive file size limits, making it the primary constraint when optimizing videos for multiple platforms. If your video meets TikTok's requirements, it will work on all other platforms.
How to Optimize Videos for Multiple Platforms
Creating content for multiple social platforms requires strategic optimization to avoid re-editing for each platform.
Start with the most restrictive specifications. Since TikTok has the smallest file size limit (72 MB on Android), optimize your videos to meet this requirement. Videos that work on TikTok will automatically work on Instagram, YouTube Shorts, and other platforms.
Use 9:16 aspect ratio for all short-form content. This vertical format works across TikTok, Instagram Reels, YouTube Shorts, and Facebook Reels. While some platforms support other aspect ratios, 9:16 provides the best viewing experience on mobile devices.
Export at 1080 x 1920 resolution. This resolution is the sweet spot—high enough for excellent quality but not so high that file sizes become unmanageable. 4K resolution creates unnecessarily large files for mobile viewing.
Keep videos under 60 seconds when possible. This duration works on all major platforms and aligns with audience attention spans. Longer videos can work on TikTok and Instagram, but shorter content typically performs better.
Use MP4 format with H.264 codec. This combination offers universal compatibility, excellent compression, and fast processing on all platforms. Avoid exotic formats or codecs that might cause compatibility issues.
Compress strategically. Use our free video compressor to reduce file size while maintaining quality. Start with medium compression and adjust based on results. Always preview compressed videos before uploading.
Step-by-Step: Prepare Videos for TikTok and Instagram
Follow this workflow to ensure your videos meet all requirements:
- Edit your video in your preferred editing software
- Export with these settings:
- Resolution: 1080 x 1920 pixels
- Frame rate: 30fps
- Format: MP4 (H.264 codec)
- Bitrate: 8-10 Mbps
- Check the file size after export
- If over 70 MB, compress the video to meet TikTok's Android limit
- Preview the compressed video to ensure quality is acceptable
- Upload to your platforms starting with the most time-sensitive
This workflow ensures your video works across all platforms without requiring multiple exports or versions. You can also trim unnecessary sections before compressing to reduce file size more effectively.
Common Upload Errors and Solutions
Understanding common errors helps you troubleshoot upload issues quickly.
"File too large" error:
- Solution: Compress your video to reduce file size
- For TikTok: Must be under 72 MB for Android compatibility
- For Instagram: Must be under 4 GB (rarely an issue)
- Use compression tools to reduce size without significant quality loss
"Invalid format" error:
- Solution: Convert to MP4 with H.264 codec
- Avoid using MOV files on Android devices
- Use our video converter to change formats
"Video too long" error:
- Solution: Trim your video to meet duration limits
- TikTok: 10 minutes maximum
- Instagram Reels: 90 seconds maximum
- YouTube Shorts: 60 seconds maximum
"Unsupported aspect ratio" warning:
- Solution: Re-export at 9:16 aspect ratio (1080 x 1920)
- Avoid using landscape or square videos for Reels and TikTok
- Crop or reframe your video to fit vertical format
"Processing failed" error:
- Solution: Check that your video meets all specifications
- Ensure stable internet connection during upload
- Try uploading during off-peak hours
- Re-export video with recommended settings
Best Practices for Social Media Video Quality
Maximizing video quality within platform constraints requires following these best practices:
Record in high quality, compress for upload. Always record at the highest quality your device supports, then compress for upload. This gives you a high-quality master file for future use while ensuring uploads meet platform requirements.
Use good lighting. Well-lit videos compress better because they have less noise and grain. Poor lighting creates artifacts that become more visible after compression and platform processing.
Avoid excessive motion. Fast camera movements and rapid scene changes require higher bitrates to maintain quality. Smoother, more deliberate camera work compresses better and looks cleaner after platform processing.
Test on mobile devices. Over 90% of TikTok and Instagram users watch on mobile devices. Always preview your videos on a phone before publishing to ensure they look good on small screens.
Upload during off-peak hours. Platform processing is faster during off-peak times (typically late night or early morning in your timezone). Faster processing often results in better quality retention.
Keep a master file. Always save your original, uncompressed video before uploading. Platform algorithms and requirements change, so having a high-quality master lets you re-export with new settings without quality loss.
Tools for Video Optimization
Several tools can help you meet social media video requirements:
Browser-based compressors like our online video compressor offer the easiest solution. No installation required, works on any device, and processes videos locally for privacy. Perfect for quick optimization before uploading.
Mobile apps like InShot, CapCut, and VN Video Editor include export presets for TikTok and Instagram. These apps are convenient for creators who edit entirely on mobile devices.
Desktop editing software like Adobe Premiere Pro, Final Cut Pro, and DaVinci Resolve provide maximum control over export settings. These tools are ideal for professional creators who need precise control over quality and file size.
Dedicated compression tools like HandBrake (free) offer advanced options for batch processing multiple videos with consistent settings. Great for creators who produce high volumes of content.
For most creators, browser-based tools provide the best balance of convenience and results. They're free, require no installation, and produce platform-ready videos in minutes.
Frequently Asked Questions
What is the TikTok video size limit in 2026?
TikTok's file size limit is 72 MB on Android devices and 287.6 MB on iOS devices as of 2026. Since Android has the lower limit, you should optimize all videos to be under 72 MB to ensure compatibility across all devices. Videos can be up to 10 minutes long, with a recommended resolution of 1080 x 1920 pixels in 9:16 aspect ratio.
Can I upload the same video to TikTok and Instagram Reels?
Yes, you can upload the same video to both platforms. Both TikTok and Instagram Reels use 9:16 aspect ratio and support MP4 format. However, optimize your video to meet TikTok's stricter 72 MB file size limit, and it will work on both platforms. Keep in mind that each platform has different algorithms and audiences, so you may want to adjust captions and hashtags for each.
Why does my video look blurry after uploading to Instagram?
Instagram compresses all uploaded videos, which can reduce quality. To minimize blur, upload videos that already meet Instagram's specifications (1080 x 1920, MP4, H.264 codec). Uploading higher-quality source files helps maintain acceptable quality after Instagram's processing. Also ensure you have a stable internet connection during upload—poor connections can trigger more aggressive compression.
What's the best video resolution for TikTok and Instagram Reels?
The best resolution for both platforms is 1080 x 1920 pixels (9:16 aspect ratio). This provides excellent quality on mobile devices while keeping file sizes manageable. Higher resolutions like 4K create unnecessarily large files without visible quality improvement on mobile screens. Lower resolutions like 720p may appear pixelated on newer phones with high-resolution displays.
How do I reduce video file size for TikTok without losing quality?
Use a video compressor to reduce file size while maintaining visual quality. Start with medium compression settings and preview the result. If quality is acceptable and file size is under 72 MB, you're ready to upload. If the file is still too large, increase compression or reduce video duration. You can also lower the resolution from 1080p to 720p, though this may affect quality on larger screens.
Conclusion
Understanding TikTok video size limits and Instagram Reels specifications is essential for successful content creation in 2026. TikTok's 72 MB limit on Android devices is the most restrictive constraint, making it your primary optimization target. Videos that meet TikTok's requirements will work seamlessly across Instagram Reels, YouTube Shorts, and other platforms.
The key is optimizing your workflow to create once and publish everywhere. By exporting videos at 1080 x 1920 resolution in MP4 format and compressing to under 72 MB, you ensure compatibility across all major social platforms. This approach saves time, maintains quality, and streamlines your content creation process.
Remember that platform requirements evolve over time. Bookmark this guide and check back periodically for updates as TikTok, Instagram, and other platforms adjust their specifications. Staying informed about these changes helps you maintain high-quality content that reaches your audience effectively.
Ready to optimize your videos for social media? Use our free video compressor to reduce file size while maintaining quality. No signup required, completely free, and your videos never leave your device. Start creating platform-perfect content today!
Image Suggestions:
- Specs Comparison Table: Visual infographic showing video requirements for TikTok, Instagram, YouTube Shorts side-by-side (Alt text: "Comparison table of video specifications for TikTok, Instagram Reels, and YouTube Shorts in 2026")
- Mobile Upload Interface: Screenshot showing successful video upload on TikTok and Instagram (Alt text: "Mobile phone displaying successful video upload to TikTok and Instagram Reels")